Thursday, August 1, 2013

Turkey, Bacon, Ranch Stuffed Peppers

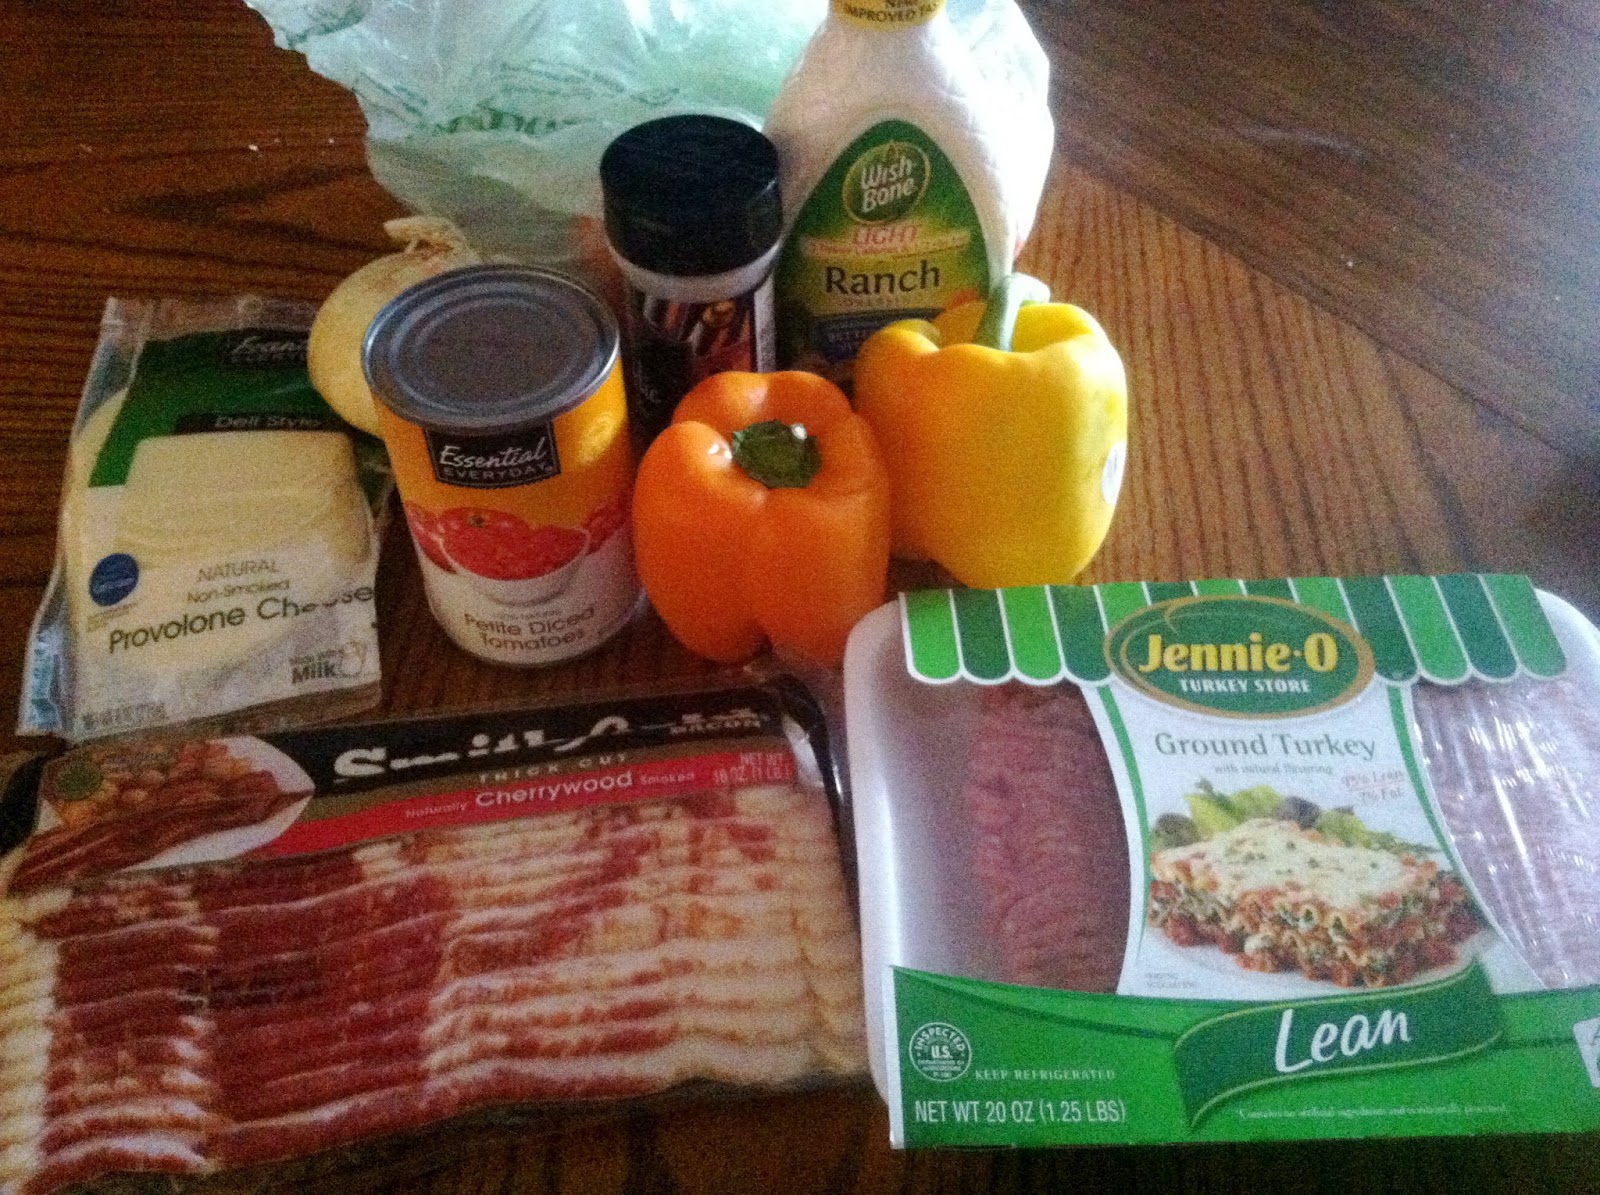
I have been wanting to try my hand at making stuffed peppers for a while now.  Last summer I went as far as buying the peppers but then ended up slicing them up and eating them with hummus.  This year I finally did it.  When looking at stuffed pepper recipes most of them use ground beef, tomato sauce, and rice.  This all sounded too heavy for a summer dish, so I decided to go a different route.  I stuffed my peppers full of ground turkey, bacon, tomatoes, onions, cheese, and some ranch dressing.  The results were even better than I expected.

Turkey, Bacon, Ranch Stuffed Peppers


Ingredients:
  • 1.5 pounds ground turkey
  • 6 bell peppers (you can use any color)
  • 1 pound bacon
  • sliced provolone cheese
  • 1 cup ranch dressing
  • 1/2 can diced tomatoes
  • 1/4 cup diced onion
Instructions:

1) Preheat the oven to 350. Bring a large pot of water (make sure its salted) to a boil. In the mean time. Slice the tops off the peppers and remove all the seed and membranes.  This should leave them looking like cups.  Toss the peppers into the boiling water and cook until they have softened slightly, about 5 minutes. Remove them from the water and let them cool.


2) In a large skillet, cook the bacon.  I like to use kitchen shears and cut my bacon into 1 inch sections before I cook it, but you can crumble it after as well.  When the bacon is done cooking strain it onto a paper towel and let it cool.


3) Discard the bacon grease and begin cooking your turkey in the skillet. Add salt and pepper. Cook on medium heat until the turkey is no longer pink. Drain the turkey and set aside.


4) Put the diced onions in the skillet and cook until translucent.  Add the tomatoes and cook for 1 minute.


5) Add turkey and bacon to the skillet with the onions and tomatoes.  Add the ranch dressing and cook for another 2 minutes.


6) Arrange peppers upright in a rectangular backing dish.  Place 1/4 of a slice of provolone cheese in the bottom of each pepper.  Put a heaping spoonful of the turkey mixture in the pepper and top with another 1/4 of a slice of cheese.  Fill the rest of the pepper with the turkey mixture and top with 1/2 a slice of cheese.


7) Bake for about 20 minutes or until peppers are tender and cheese is melted.


Sunday, July 14, 2013

Graham Cracker Ice Cream Sandwiches

Summer is in full swing and I have been craving some ice cream.  The only ice cream I have in my apartment is pumpkin ice cream left over from all of my Halloween activities.  Pumpkin ice cream isn't something I normally eat on its own, so I had to find something to add to it.  After lots of experimenting I found it best when it was turned into a simple ice cream sandwich.

Graham Cracker Ice Cream Sandwiches

Ingredients:
  • Ice cream
  • Graham crackers
  • garnishes 


Instructions:

1) Begin by letting the ice cream sit out long enough so that is soft enough to spread.

2) Using a spoon take a large spoonful of ice cream and spread on the graham cracker.


3) Place a 2nd graham cracker on top to form a sandwich.  You can then roll the sides in whatever garnish you would like. Sprinkles, chocolate chips, chopped nuts, etc.  I tried black sprinkles to give it a Halloween vibe but it looked pretty bad so don't try that.

4) Place the completed sandwiches in the freezer and then freeze until the ice cream is firm.


Friday, July 5, 2013

ACen/Cheria final product - Tales of Graces

Well...its been about a month two months since I went to ACen, so maybe its about time I got around to posting the pictures of my cosplay and some of the cool stuff I picked up.

ACen overall was a pretty good experience.  I bought some new things, met some awesome people and got to show off all the hard work I put into my cosplay.

If you like my cosplay please like my facebook page and follow me on twitter @forstericosplay 

Some of the goods I acquired....


acen, wig, corset

The first thing I bought was a corset.   I have never owned a corset before, but when I saw them I just couldn't resist.  The whole process is rather time consuming as they have to fit you for it to make sure the size is right and they let me try out some different styles before I made my final selections. Everyone at the booth was very helpful and I would highly recommend their corsets. They are well made and the designs are beautiful. You can check out their Facebook page here.


bat
alpaca


The next booth I stopped by was Tasty Peach Studios.  They have some of the cutest things you will ever see.  I picked up the zombie alpaca plushie as well as the adorable bat necklace.  


The last thing I bought was this little turret figure from the Portal games.  I actually have 3 of them in different patterns but this is the one that sits on my desk at work.


And now for the main event.  COSPLAY PICTURES!!!

cosplay, cheria, tales of graces

Overall I am pretty pleased with the finished product.

cheria, cosplay, pascal, tales of graces


I walked around with a friend who was cosplaying a character from the same game (Tales of Graces), and we had a lot of people stop and ask us for pictures which was a fun experience. 


cheria, asbel, cosplay, pascal, tales of graces

We also ran into someone dressed as Asbel from ToG which was really cool.


While wandering around we ran into a few other characters from the Tales games that invited us to a meet-up at Denny's.  We got to meet several other tales fans and discuss the games over dinner.  By the time we took the picture a few people have wandered off already, but here are is a pretty cool group shot.  It was nice to meet so many new people who enjoy the games. 

tales of graces, cosplay, cheria

Wednesday, May 1, 2013

Color Run 2013

      If someone had told me 5 years ago that I would run a 5K in my life time I would have told them they were insane.   Running has always been something that was very hard for me.  I never did sports as a kid and I shied away from activities that included running.  I have short legs and was never in the best physical shape.  About a year ago I decided I wanted to change it.  I tried running outside and it was terrible.  I felt ridiculous and embarrassed.  My mom had a treadmill she wasn't using so I asked my dad if he could bring it up to me in Chicago.  He did, and I tried running on that.  I felt much more comfortable and did that on and off for about 6 months. I usually only ran a mile but that was huge progress for me. 

      In February I saw that registration for the color run was open for the St. Louis date.  Its a fun run which means it is not timed and it welcomes both runners and walkers.  I thought that maybe this was something I should try.  I talked to my family and we got a team together and registered.  Then it was time to get training.  I wasn't really sure where to start so I just started running/walking for as long as I could on the tread mill.  This was usually about 1.5- 2 miles.  About a month before the race I got serious.  I ran everyday.  I would follow the pattern of 1 mile, 2 miles, 3 miles, 2 miles, 1 miles. I also started running outside so I could see the difference between that and the treadmill.  Luckily the difference wasn't as extreme as I thought it would be.  When I did my first 3.1 mile run outside I was so proud.  I walked a fair amount of it but I did it.  From there I tried to decrease the amount of time I walked and get my time down from the initial 43 minutes. 


     On the day of the race I started my morning with healthy breakfast. I then put on my clean white shirt, running parts, and my favorite Nike running shoes. Sadly the weather wasn't looking too good, but nothing was stopping us from doing this run. My mom, sister, two of my sister's friends, and I hopped in the car and headed to St. Louis. 


   When we arrived at the starting area the weather was about 50 degrees and rainy. They had many areas to take pictures as well as a stage featuring Zumba for a warm up.  We took some pictures and jumped around a bit in efforts to stay warm. 


      Finally it was time to start the race.  The course was basically a large rectangle with a color station set up at each kilometer. The color stations have music and people who spray colored cornstarch on you from what look like ketchup bottles.   You can take your time and get lots of color or just run through.  I ran the majority of the course but I did take my time through the color stations. 


    My sisters friend and I were the first people to finish from our team. I was pretty proud of myself as I ran waaay more of the race than I expected.   Since it was raining I didn't want to use my phone to time myself, but I'm pretty confident that was my best time yet. 


     In the finish area they give you packets of powder to throw around.  They also do a large group throw where everyone tosses the color up at the same time.


     Overall I highly recommend the color run, especially for those of you that aren't runners.  It is a great way to get out there and get active. Plus it is a ton of fun!


Sunday, April 28, 2013

Cheria - Part 2

This week I made more progress on my Cheria cosplay.  I was about to dye the trim for the skirt as well as attach it to the skirt.  I also got a few of the pieces I ordered in the mail, which was super exciting. I even found over knee black socks which was more difficult than expected.  There is still a lot to do and not a lot of time to do it, but I feel like its coming together pretty well.   Luckily I have a day off work this week, so hopefully I can devoted a lot of time to working on the top.


Dyeing the lace went significantly better than I thought it would.  I filled a pan with water, added about 1/2 a bottle of black RIT dye, and tossed in the lace.  I let it cook on the stove for about 15 minutes and it was done.   I then rinsed it off in the sink and let it dry.


Once the lace was dry I pinned it to the hem of my skirt.  I haven't sewed it yet.  I want to make sure that I am 100% happy with the length before I sew it on.  The current theme is to keep making it shorter. 

pink


One of the things I received in the mail this week was my wig.  I LOVE IT!! I ordered this awesome pink wig from Arda Wigs.  It even came with a cute little drawing of Cheria from one of the ladies I know there.   The plans for the wig are to use RIT fuchsia dye to dye it and then to cut it shorter and add the pig tails on the top.


Here is the other piece of the outfit I got in the mail. Finding plain white boots was a tricky task.  I found these on Ebay. Technically Cheria's boots don't have heels, but I'm short and need the extra height.  I plan on making the sole and the heels black with either a sharpie or some black paint.   After that I have to add the red ribbon details to the sides. 


This is rough assembly of the pieces I have so far.  I have the skirt, socks, shoes, and wig.  Goals for this week are to add the details to the boots, dye the wig, and start on the top.  My weekend is all booked up so hopefully I can get most of that done during the week. 


Thursday, April 25, 2013

Dark Chocolate Espresso Scones


Today we had a brunch at work for all the administrative staff.  So. Much. Food.  I haven't baked anything in awhile so I decided to contribute some homemade scones for the occasion.  They seemed to go over quite well.  Hopefully there won't be any leftovers to take home.

Dark Chocolate Espresso Scones


Ingredients: 
  • 2 cups all-purpose flour
  • 3 tbsp granulated sugar
  • 1 tbsp baking powder
  • ¼ tsp salt
  • 1/8 tsp ground nutmeg
  • 1 tsp coffee grounds
  • 6 tbsp very cold unsalted butter
  • 5 oz. dark chocolate chips
  • 1/2 cup half and half
  • 1 large egg
  • ½ tsp pure vanilla extract

Instructions:

 1) Preheat the oven to 400.  In a large bowl, mix together the flour, sugar, salt, baking powder, nutmeg, and coffee grounds. I used pumpkin spice coffee so feel free to play around with flavors.


2) Cut the cold butter into slices and add to the dry ingredients.  Using a whisk or a pastry cutter, cut the butter into the flour.  The chunks of butter shouldn't but much larger than pea size when you are done. 


3) Stir in the chocolate chips.  


4) In a separate bowl, whisk together egg, half and half, and vanilla.  Make a well in the dry mixture.  Pour the wet mixture into the dry one. Stir until loosely combined.


5) Turn the dough out onto a floured surface and press together gently until it forms a ball.  Pat dough into a circle that is about 1 inch thick.  Using a biscuit cutter cut the dough out in circles.  Combine the scraps and press together again. Cut out more circles.  Keep doing this until you have used all the dough.   I got about 12 circles out of mine. 


6) Brush the tops of scones with milk and sprinkle with sugar.


7) Bake 17-20 min or until golden brown.  Let cool on a cooling wrack. 

Saturday, April 20, 2013

Cheria - Part 1

This year I will be attending the Anime Central for the first time ever. For anyone who is unaware this a large anime convention held in Rosemont, Il.   I will also be cosplaying for the first time.  This is a whole new adventure for me, and the next month will be completely occupied getting my outfit together.   I really don't have a lot of experience sewing, so this should be interesting as I am making the majority of my out fit from scratch.  

The character I chose to cosplay is Cheria from the game Tales of Graces.  She is super cute and I hope to do her justice.


So far I have ordered my wig, shoes, and contacts.  I have also bought most of the fabrics and accessories I need.  All that's really left is to throw it all together. 


As you can see the lace I have is currently white, but I have purchased some black dye to attempt to dye it.   The other 2 bottles of dye will be used to dye my wig once I get it.  That will be a fun adventure for another post. I have commissioned another cosplayer to make my broach as well as a set of daggers, more about those when I have more pictures. 

Today I began work on the skirt.  Like I said, I have very little sewing experience so I was a bit scared. Luckily it all seems to be coming together pretty well.  I made all the pleats, and attached the waistband. 


Goals for this week are to dye the lace and finish the skirt.  Next week I hope to be able to start on the top.  To be continued...